DIY Faux Capiz Shell Pendant Light - Chandelier
Cypher says "summertime" like shells, and this (imitation) capiz shell chandelier is then summery and fresh. Plus, it's very easy to DIY in an afternoon, which means enough of time to hit the puddle, the neighborhood barbeque, or the hammock with your favorite book.
 View in gallery
 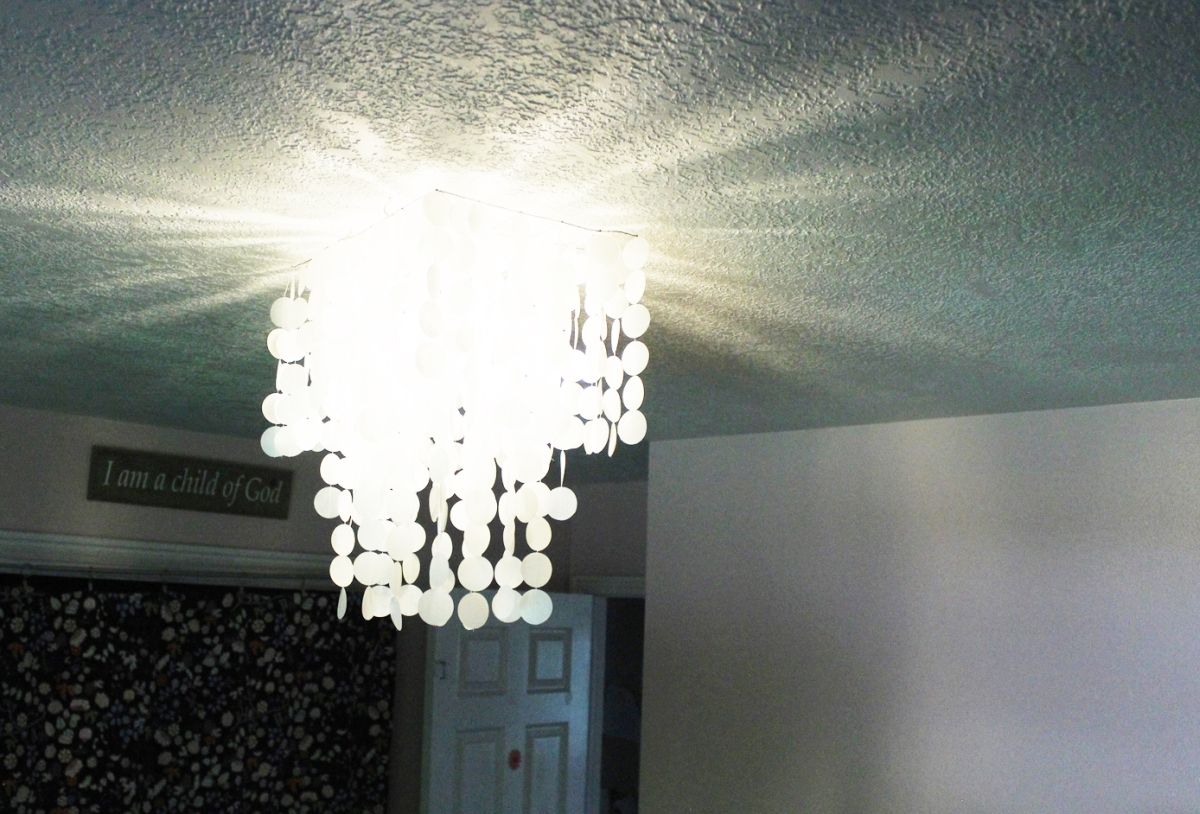 View in gallery
 Even though these "shells" are nada more than than laminated rice paper, they certainly requite off the feel of translucent capiz shells, whether the light is turned on or off.
 View in gallery
 And, as with any DIY project, you can customize this to fit your space, every bit bit or every bit modest as you desire it, and equally sparsely or every bit thickly "shell"ed equally you like. Savour!
 View in gallery
 Materials Needed:
- Wire grating, cutting to size
- Laminated rice paper (example uses four laminated fifteen"x23" sheets)
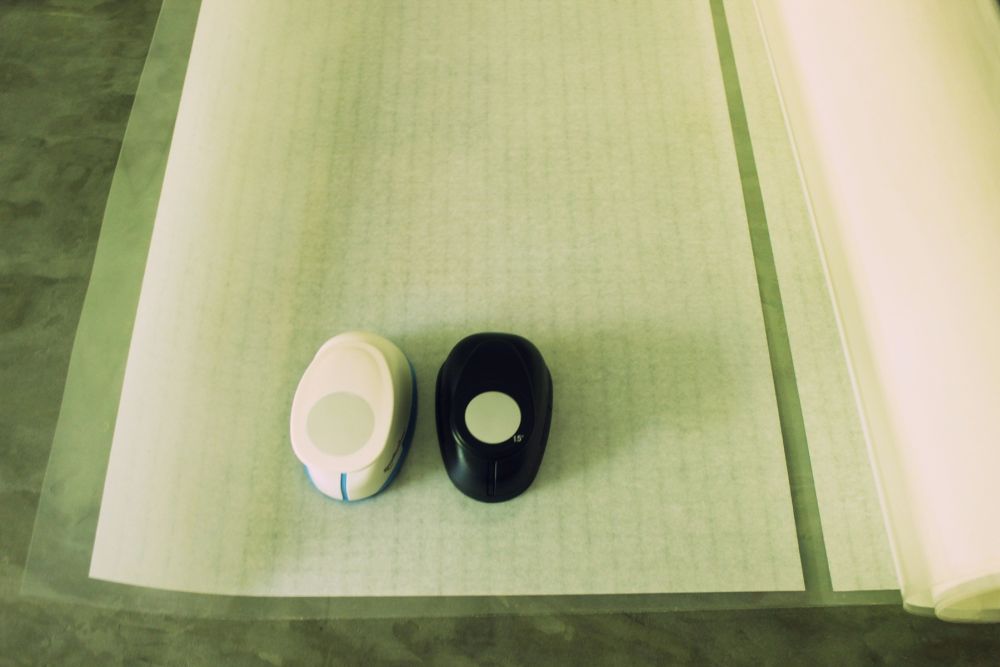
- One or two paper punches in the size/shape you like (example uses ane.5" circle punch)
- Sewing motorcar & white thread
- Hot glue& hot glue gun
- Aluminum foil & wax newspaper (optional)
 View in gallery
 Begin with some wire grating for the top of your chandelier light.
 View in gallery
 Cut it down to the size you desire with can snips. (Note: If you want a circular shell pendant, you might consider using grating with a smaller filigree, or find something that'south already round.)
 View in gallery
 Trim any abrupt wire ends, so flatten out your grid. You can spray pigment this white (or whatever the colour of your ceiling is) if you want for a more "invisible" grid once the pendant light is installed.
 View in gallery
 Now it's time to create your faux capiz shells. You need laminated rice paper and a circumvolve paper dial or ii. (Note: Rice paper is sold near the calligraphy things at a craft store. This example uses a xv" ringlet, cut into 23" lengths and taken to an office supply shop to exist laminated.) Trim the lamination up to the edge of the rice newspaper.
Use your newspaper punch to punch circles along the edge of your rice newspaper. I took this photo to prove this step…
 View in gallery
 but actually the punching attempt looked more like this. Information technology'south not piece of cake on your palm, but if your circle punch is sharp, it'll be amend.
 View in gallery
 Work your manner all around the perimeter of your laminate rice paper, keeping the punches as close together every bit y'all can without letting them overlap.
 View in gallery
 Use scissors to trim off the circle shadows, and so repeat the procedure on the now-smaller perimeter.
 View in gallery
 Empty your dial periodically (every five-10 punches) so it doesn't go jammed up.
 View in gallery
 Go on going until (a) your hand falls off, or (b) you run out of laminated rice paper. No guarantees on which of those will come first.
 View in gallery
 You may or may not detect your circles starting to have fuzzy edges and exist harder to punch after a while. This is because laminated rice paper isn't the same as regular craft paper; information technology's much harder for these punches to muscle through.
 View in gallery
 If you lot start to notice this, take some aluminum foil and fold it over two, iii, or even iv times. Flatten it perfectly.
 View in gallery
 Run this folded-and-flattened aluminum foil through your hole punch a bunch of times.
 View in gallery
 This is to help acuminate the bract. As you can encounter, I did this a number of times.
 View in gallery
 If y'all observe your punch sticking, pull out some wax paper and fold it over.
 View in gallery
 Flatten the wax paper, and dial through it a few times. (Notation: I would recommend doing this aluminum step from the beginning; afterwards each perimeter of your laminated rice paper, I would punch 3 or 4 aluminum circles to keep the blade precipitous. I made the mistake of going too long without sharpening it at all, and the bract on my circumvolve punch became too dulled that I just couldn't sharpen it later on that.)
 View in gallery
 With your bucket full of punched shells," it's time to get-go sewing together our strands. Pull out about eight" of lag thread on your machine.
 View in gallery
 Set your first trounce down with the back arc directly below your needle. Lower your pressure human foot, and sew straight downwards the center. Slide another trounce along with it as you lot sew so that when you reach the edge of your starting time shell, the second shell is correct there to take the seam.
 View in gallery
 I found it easiest to sew two strands at a time. And so, for the outer capiz shell strands, I wanted each strand to have 6 shells, which ways that (later the initial 6"-8" of lag thread) I would run up 12 shells together with no gaps.
 View in gallery
 After the 12th shell, I lifted the pressure pes and pulled the last beat away from the automobile to create another 8" lag thread.
 View in gallery
 Belongings the final shell away from the auto at that 8" distance (roughly), I then placed the offset shell of my side by side 12-shell strip under the needle, lowered the pressure level foot, and began sewing the next strand of shells.
 View in gallery
 Afterwards three or so strands are sewn, cut the 8" lag thread (between the strands) in half to split the strands. Lay these out straight and flat then the shells don't get tangled.
 View in gallery
 Then cut the thread between the two center shells (in this case, between shells #half dozen and #7). You lot will now have 2 strands of six shells. Each strand should have enough lag thread on one end of each strand to tie the strand to your wire grating.
 View in gallery
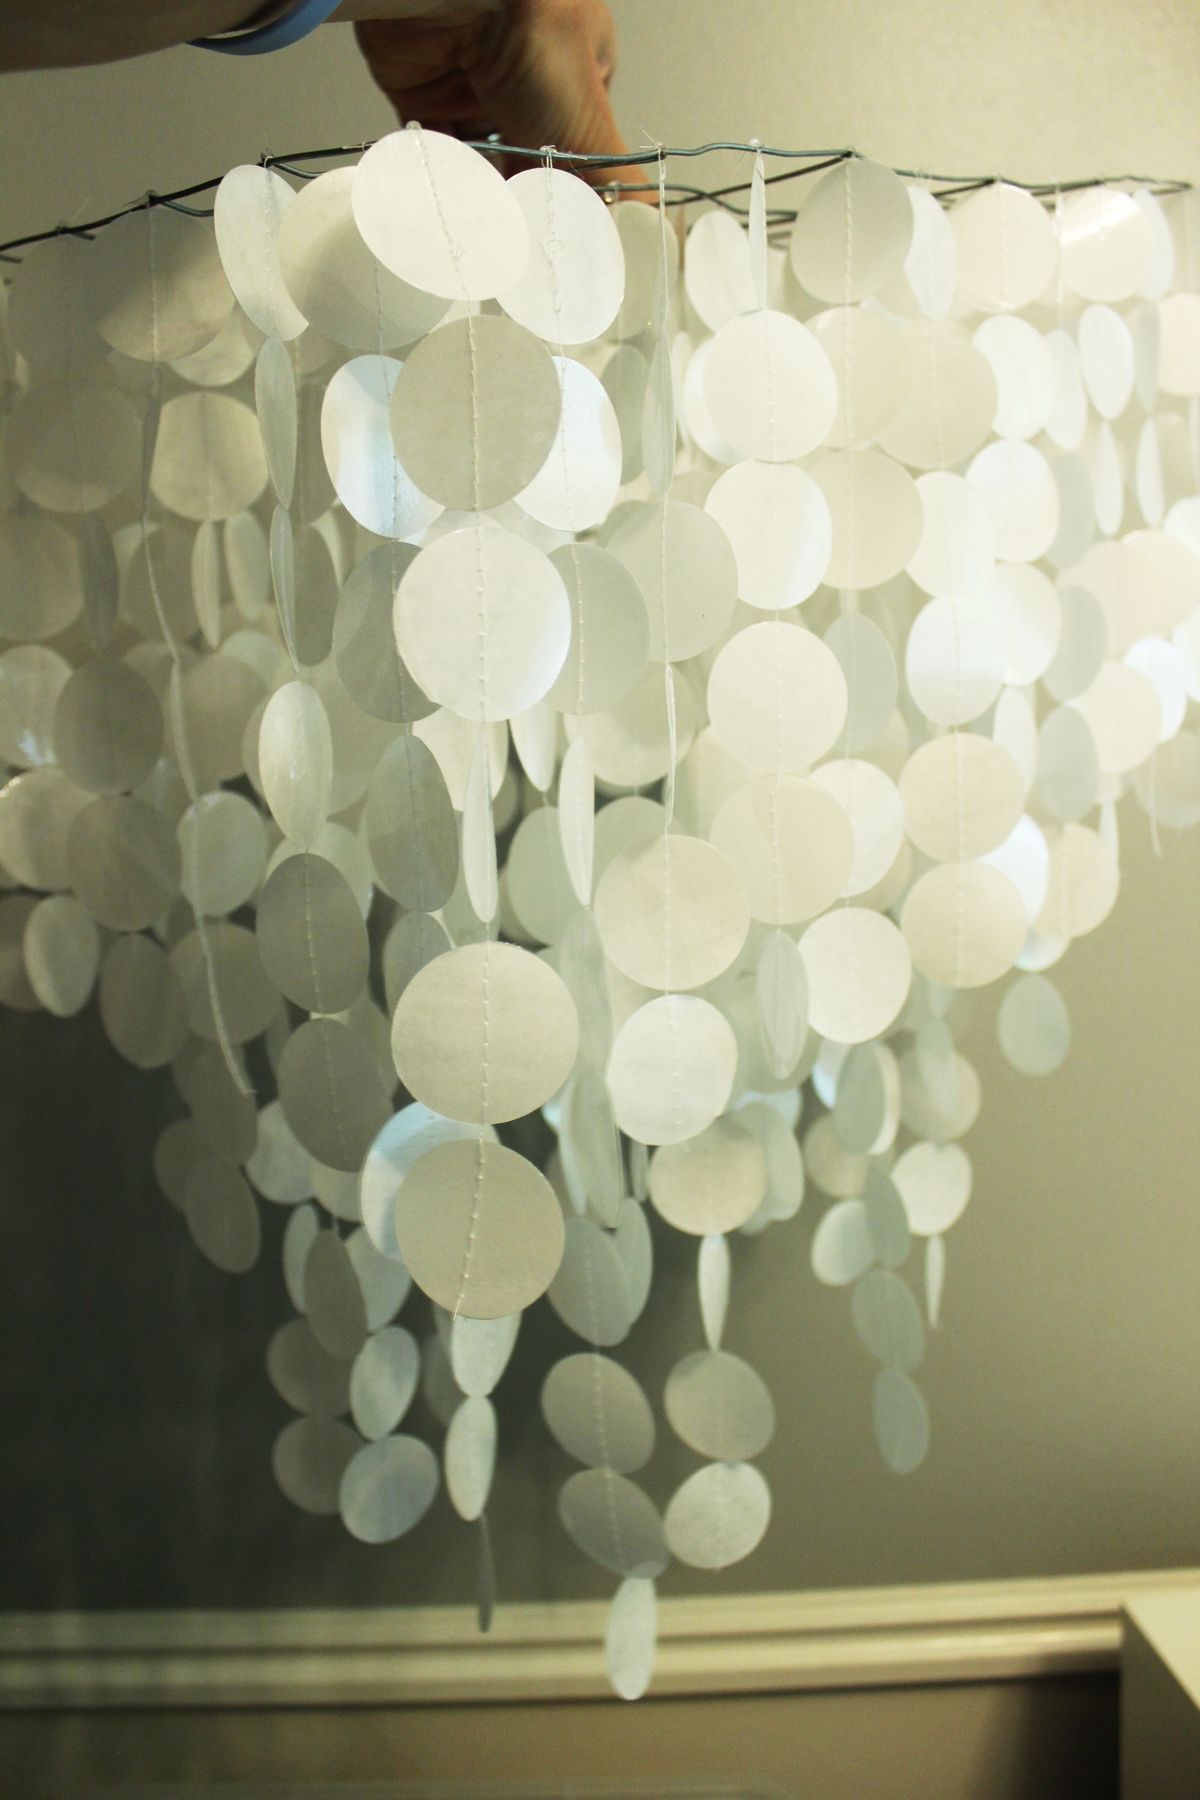
 Carefully necktie a strand onto the outer rim of your wire grating with a square knot. Don't pull too tightly, or the thread could rip; you want your shell just loose enough to dangle freely correct below the wire grating.
 View in gallery
 Go on working your style along the outer rim of your wire grating.
 View in gallery
 It's helpful if you take enough room to exist able to allow the strands lie apartment out to the sides, then they don't get tangled and and then you tin tell exactly where you are in the tying process.
 View in gallery
 Trim off backlog lag thread after tying, to about 1/4″.
 View in gallery
 Piece of work all the fashion effectually your wire grating perimeter.
 View in gallery
 At this point, you lot can hold it upward to check fulness. Call back that y'all'll have several layers, just you can get a feel for how thick the faux capiz shell look will be. Experience gratis to add together more strands (peculiarly on this outer layer) if it feels skimpy.
 View in gallery
 Once you've completed the perimeter to your satisfaction, hot mucilage the very top of each square knot then information technology maintains both the knot and the position on the wire.
 View in gallery
 Before beginning on the second and 3rd tiers, I found it helpful to rest my wire grating on a couple of blocks, which were on top of a box, then that the strands could drape over the sides.
 View in gallery
 This also allowed me to thread the strand down through the wire grating earlier tying it, which kept the strands out of my working way and also away from getting tangled with others. (Note: In this case, the second tier had viii-shell strands.)
 View in gallery
 After the 2nd tier, go ahead and hold upwards the pendant at this point to cheque on capiz beat density. Once it's to your satisfaction, motion on to the third tier.
 View in gallery
 The 3rd tier used 11-shell strands. You can increase the drama of your faux capiz shell chandelier by increasing this center section significantly; I wanted less drama and more charm in this particular pendant light, so I kept the center length more moderate.
 View in gallery
 I connected to sew the strands together in a back-to-back mode (with lag thread, then shells for strand A, and so shells for strand B, then lag thread). Each double-strand was cutting in half.
 View in gallery
 After your 3rd (or whatever number is your concluding) tier, you should be able to agree it up and really get a sense of the shell fulness. If for whatever reason you detect a section less full than you'd like, simply sew together some more strands and tie them on in that section. Information technology doesn't have to be precise! I added an extra 6-trounce strand on all four outer corners for this very reason.
 View in gallery
 With your shells all stranded, tied, and glued in place, it'southward at present fourth dimension to ready to mount your fixture. Brainstorm by using tin can snips to cut out the center wires, whichever wires (or sections of wire) that aren't being used.
 View in gallery
 You can meet here the now-empty center of the fixture, to let for the exposed bulb hanging from the ceiling.
 View in gallery
 Spiral at least four center hooks into your ceiling at whatever points yous feel would all-time support your fixture. Keep in mind that this pendant low-cal probably looks more substantial (weight-wise) than information technology actually is. It'south very light, so yous don't need a million hooks for weight. Just for stability, really.
 View in gallery
 The hooks don't need to be on the outer tier, either. They certainly can be, only they tin also be on the second or third tiers as well. Whatever works for your space.
 View in gallery
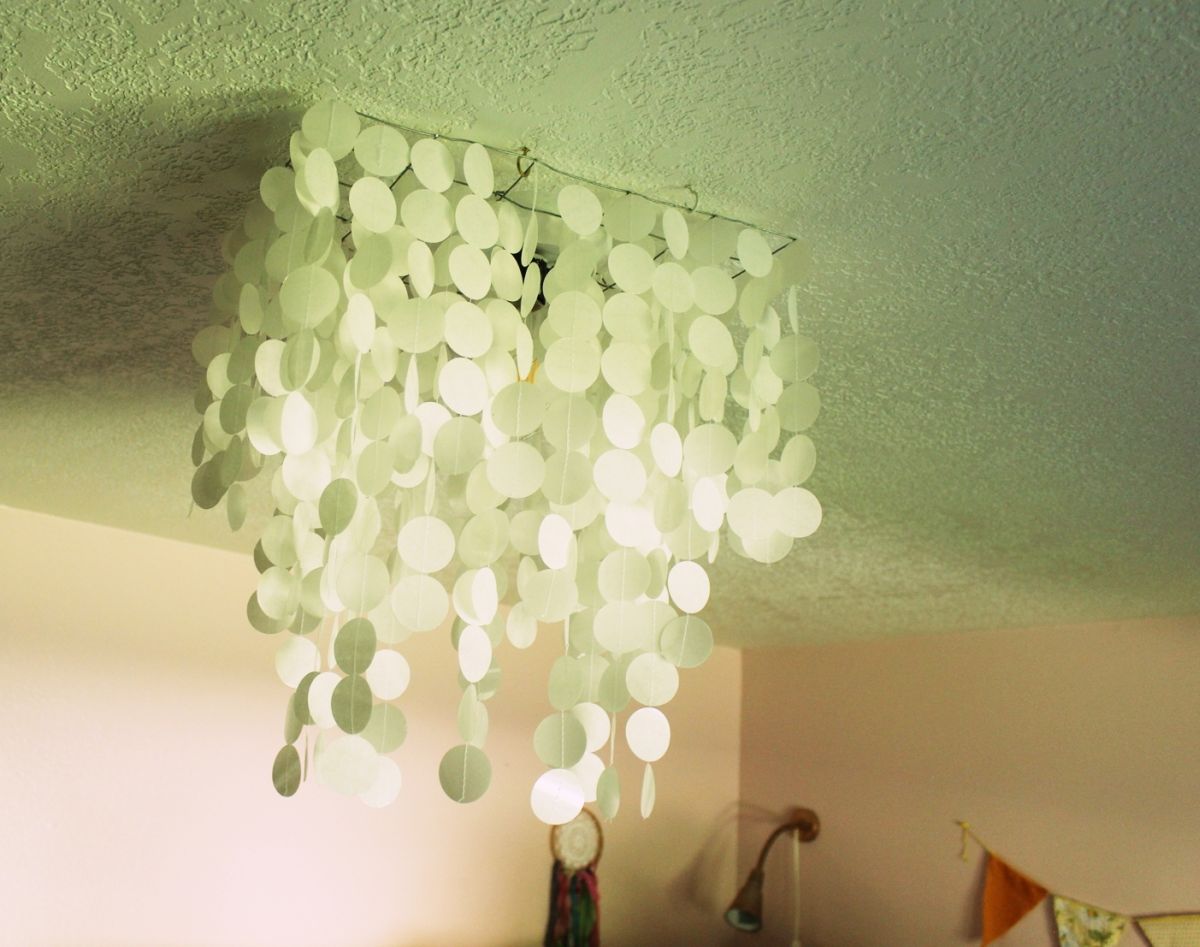
 Go ahead and hang information technology upwards, making sure it'south stable and even. Viola!
 View in gallery
 A new, deceptively uncomplicated, and ultra-feminine DIY chandelier light!
 View in gallery
 I like this method of sewing the laminated rice paper together because it allows the shells to dangle freely, even spinning and swaying with the slightest cakewalk, just similar real capizshells might.
 View in gallery
 The sewing method likewise is surprisingly "invisible." That is, you might worry that the sewing lines down the center of each shell would be obvious and off-putting.
 View in gallery
 In reality, when the light is all assembled, and the strands are all together, the sewing is inappreciably noticeable, if at all.
 View in gallery
 Here'due south a view of the light from straight below. Even though it won't really be seen (much), I withal recommend using a pretty Edison-style light bulb if you tin. Because the bulb is completely exposed from straight underneath the pendant light.
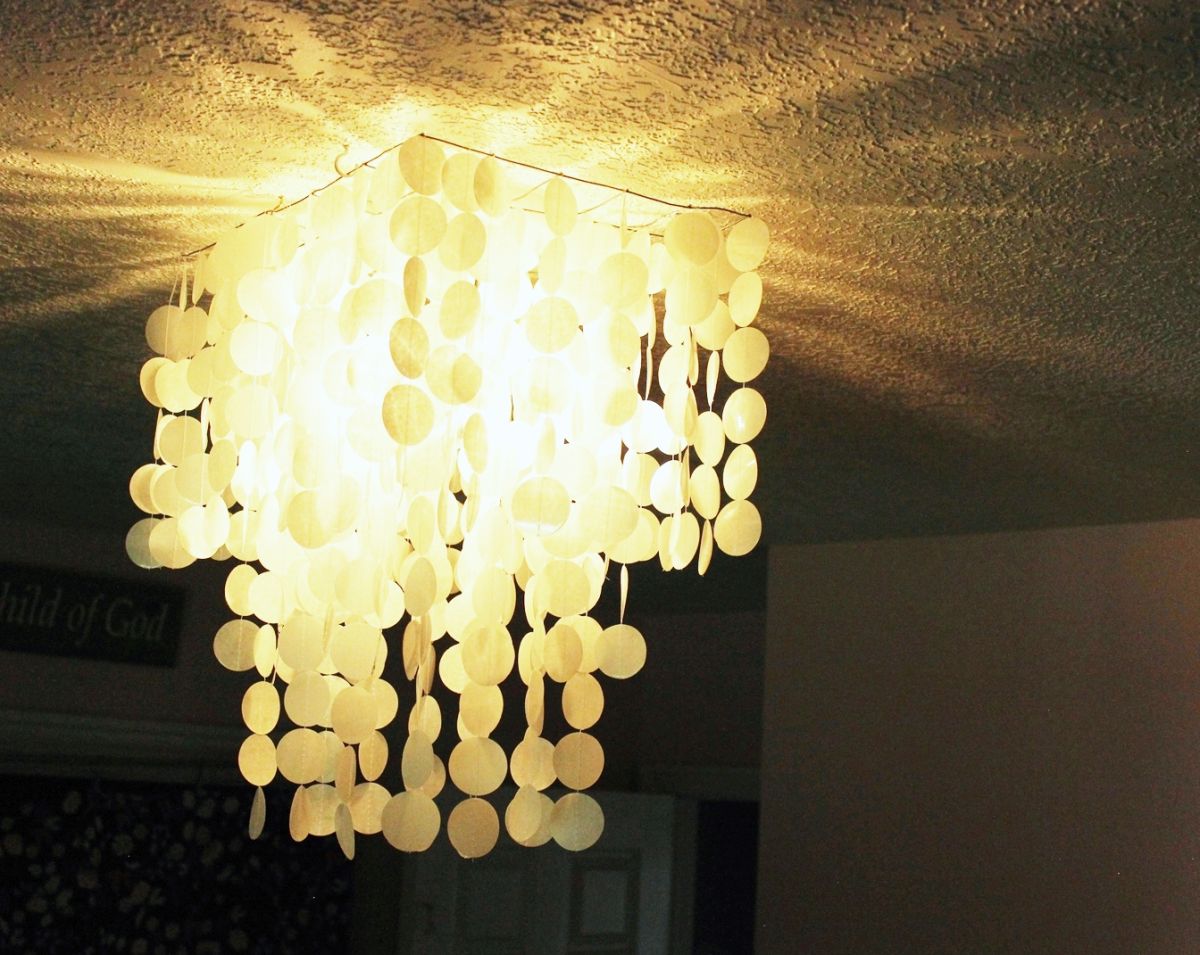 View in gallery
 This photo doesn't do the fixture justice when it'southward lit. The shadowing is simply beautiful. Very romantic and sweet at the same time.
 View in gallery
 I promise you lot relish creating your own DIY faux capiz crush chandelier lite. Even more, I promise yous dearest the finish result.
Happy DIYing.
Source: https://www.homedit.com/capiz-shell-chandelier/
0 Response to "DIY Faux Capiz Shell Pendant Light - Chandelier"
Post a Comment